A yard sign isn’t just a piece of corrugated plastic; it’s a high-stakes handshake with every potential customer who drives by your property. While it’s tempting to think you can simply push a wire frame into the dirt and walk away, the reality is that poorly executed placement often leads to bent H-stakes, damaged sign faces, and missed opportunities. When you choose to install yard signs without a technical strategy, you risk your brand looking amateur or losing your message to a stiff breeze before the first lead even calls.
We know that a professional outdoor presence requires more than just luck. You want a sign that stands straight, resists the elements, and commands attention from the road. This guide will help you master the technical mechanics and strategic placement of your signage to ensure maximum visibility and durability for your brand. We’ll walk through the specific tools for difficult terrain, the physics of wind resistance, and the sightline engineering required to secure a high-impact, long-lasting outdoor presence.
Key Takeaways
- Learn how to assess your site and select the correct hardware so you don’t end up with bent stakes in difficult soil.
- Discover the precise mechanics to install yard signs without scuffing the graphic face or compromising the structural integrity of the panel.
- Master the transition from temporary wire stakes to high-prestige commercial frames that reflect a more sophisticated brand image.
- Apply sightline engineering and the “2-Second Test” to ensure your message captures maximum attention from oncoming traffic.
- Understand the logistics of scaling a campaign across large territories while maintaining absolute brand consistency through expert production.
Pre-Installation: Essential Tools and Site Assessment
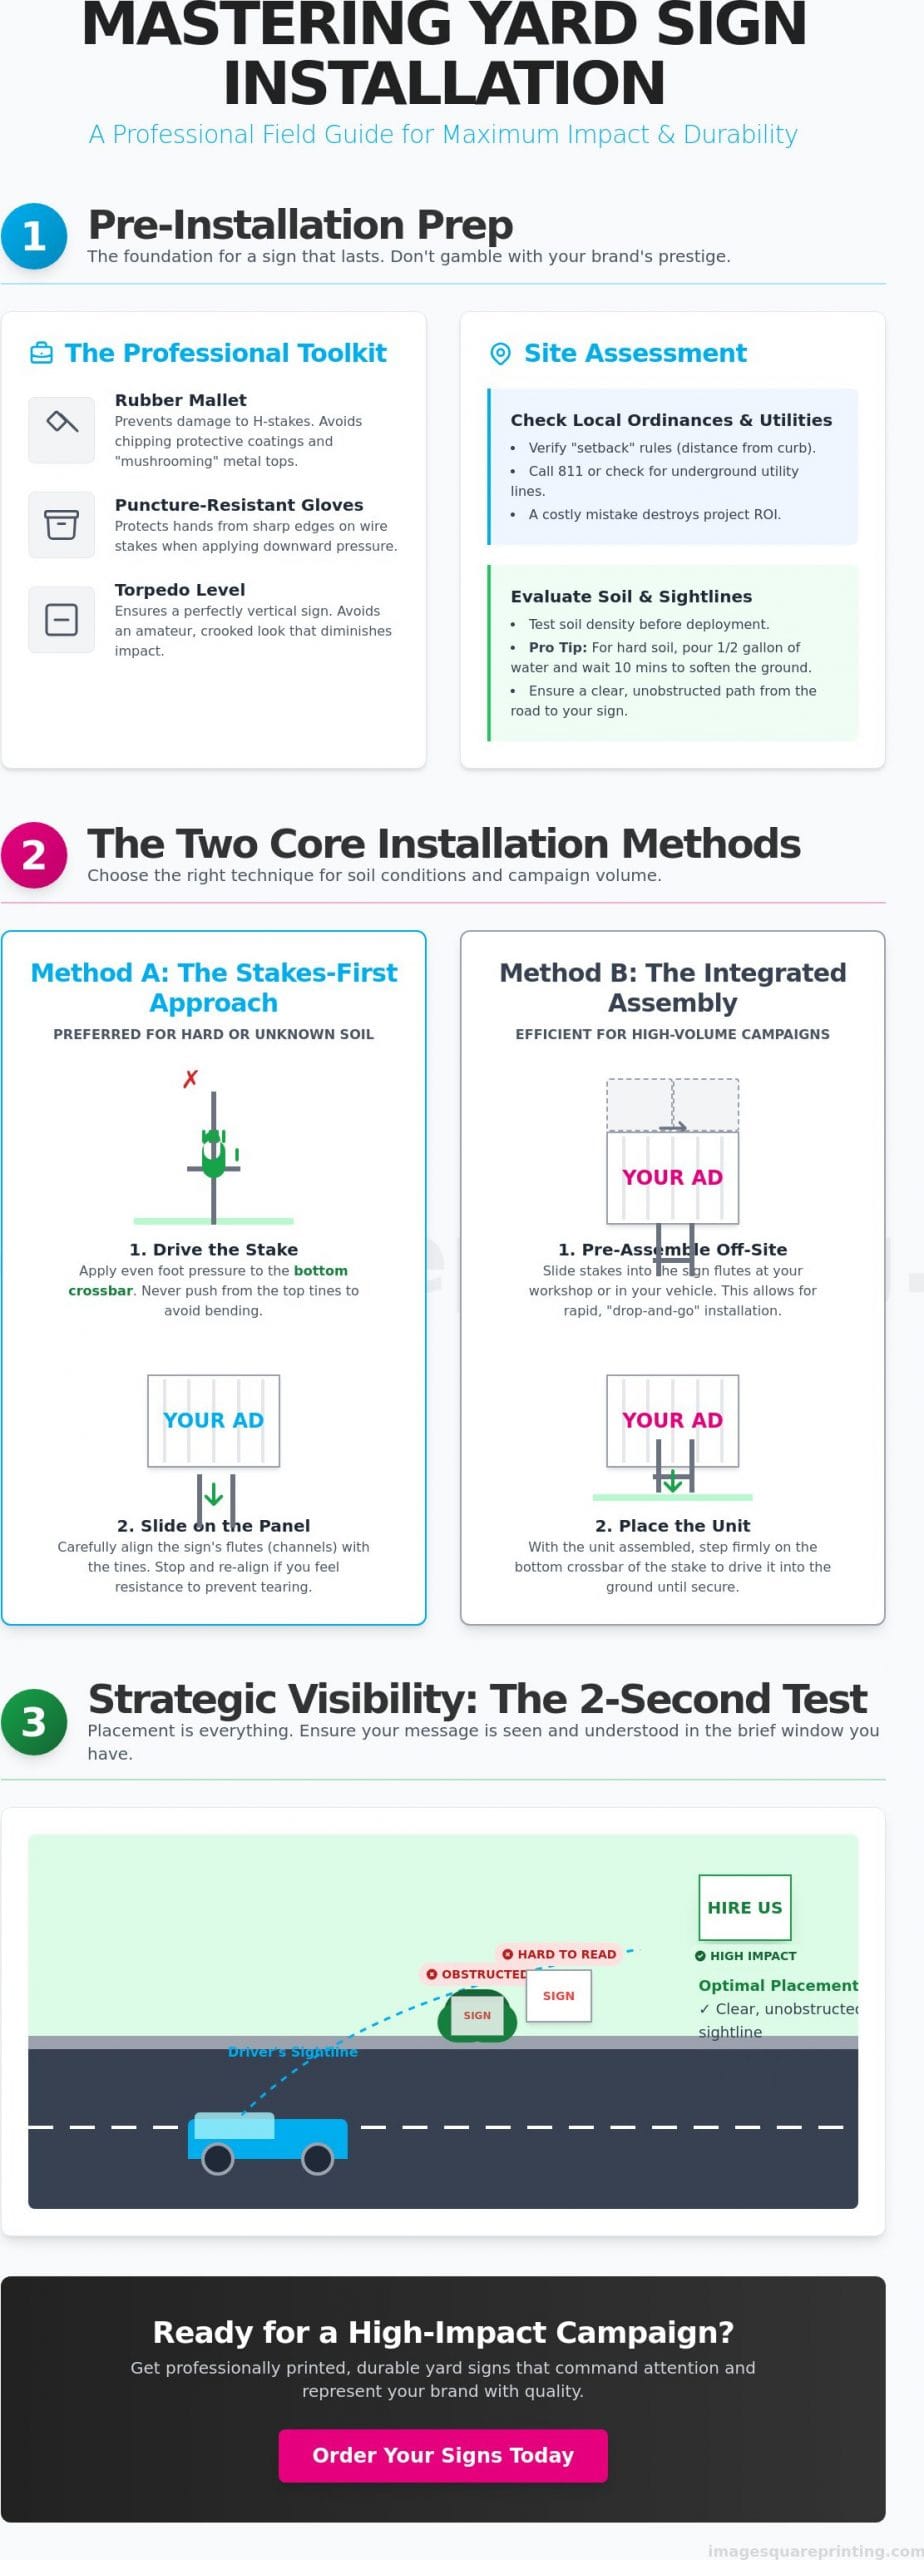
Professional preparation is the invisible foundation of every high-impact display. When you install yard signs without a site assessment, you’re essentially gambling with your brand’s prestige. A sign that leans or collapses due to poor soil integration sends a message of negligence to every passerby. By contrast, a perfectly leveled, securely anchored sign suggests reliability and attention to detail. Before heading into the field, you must verify local ordinances and utility locations. Many municipalities have strict “setback” rules requiring signs to be a specific distance from the curb. Additionally, always check for underground utility lines. While H-stakes are shallow, hitting a buried cable is a costly mistake that destroys your project’s ROI.
Understanding common types of yard signs is only the first step; matching your hardware to the environment is where the technical precision begins. If you are deploying high-quality outdoor signs in a high-wind corridor, standard wire stakes might not suffice. You need to inventory your hardware to ensure it can withstand the specific environmental pressures of your chosen location.
The Professional Installation Kit
Every master craftsman knows that the right tool prevents hardware failure. Ditch the standard metal hammer; a heavy-duty rubber mallet is your best friend. Metal hammers often chip the protective coating on stakes or cause the metal to mushroom, making it difficult to slide the sign panel on later. You also need a pair of thick, puncture-resistant gloves. The edges of wire H-stakes can be surprisingly sharp, especially when you’re applying downward pressure. Finally, keep a small torpedo level in your kit. Eyeballing the alignment is a recipe for a crooked display that looks amateur and diminishes the visual impact of your graphics.
Site Evaluation and Soil Preparation
When you prepare to install yard signs in unfamiliar territory, don’t wait until you’re on-site to discover the ground is as hard as concrete. Testing soil density is a critical pre-deployment step. If you encounter compacted clay or rocky terrain, use the “watering technique.” Pouring about half a gallon of water over the intended spot and letting it soak for ten minutes will soften the earth enough to allow for a smooth, straight entry without bending your stakes.
Strategic placement also requires a clear sightline analysis. Walk or drive the route yourself to identify hidden obstructions. A sign placed behind a maturing bush or a utility box loses its effectiveness immediately. You want a clear, unobstructed path between the driver’s eye and your message. If the soil is too rocky or the sightlines are blocked, you may need to pivot to heavy-duty frames or alternative mounting solutions to maintain visibility.
Step-by-Step Mechanics: The Two Primary Installation Methods
Success in the field is a matter of technical precision. When you install yard signs, the physical execution determines if your display looks like a professional brand asset or a DIY project gone wrong. Choosing between the stakes-first or integrated approach depends largely on your soil density and total campaign volume. While the goal is a secure mount, you must also consider official sign placement requirements regarding verticality and angle to ensure your message remains legible and compliant with local safety standards.
Method A: The Stakes-First Approach
This is the preferred technique for hard or unknown soil conditions. You drive the H-stake into the ground first by applying even foot pressure to the bottom crossbar. Never push from the top tines; this leads to immediate bending and compromises the metal’s structural integrity. Once the stake is vertically true and securely anchored, align the center of your sign panel over the vertical tines. Slide the panel down carefully. A common error is the “missed flute” tear, where the metal tine pierces the outer skin of the corrugated plastic instead of sliding into the internal channel. If you feel any resistance, stop and re-align. Ensuring the tines are perfectly centered within the flutes protects the visual integrity of your UV printed corosigns.
Method B: The Integrated Assembly Method
High-volume campaigns require a focus on speed and repetitive efficiency. Pre-assembling your signs before you reach the deployment site allows for rapid, “drop-and-go” installation. Slide the stake into the sign flutes at your workshop or in the back of your vehicle. When you arrive at the site, use a “push block”—a small piece of wood or heavy plastic—to apply pressure across the top edge of the sign panel. This distributes the force evenly across the frame, preventing the stake from punching through the top of the sign. This method works best in soft, pre-saturated soil where you don’t expect heavy resistance from rocks or buried debris.
Achieving perfect vertical alignment on the first attempt saves time and prevents “metal fatigue” caused by repeated bending. If you hit an obstruction, don’t force the stake. Pull it out and shift the placement three inches to the left or right. Forcing a stake through a rock usually results in a permanent kink that makes the sign lean. To keep the graphic face pristine, handle the panels by the edges only. If you’re managing a large-scale rollout, our durable outdoor signs are engineered to withstand the rigors of professional handling while maintaining a high-prestige appearance.
Beyond H-Stakes: Installing Heavy-Duty Frames and Commercial Signs
Moving beyond the standard wire frame elevates your brand from a temporary fixture to a semi-permanent landmark. When you install yard signs for high-prestige commercial projects or long-term real estate listings, the hardware must reflect the quality of the service provided. Temporary H-stakes serve a purpose for short-term events, but they often fail under the weight of larger panels or sustained wind pressure. Transitioning to heavy-duty frames ensures your message remains upright and professional, regardless of the weather. This shift requires a focus on mechanical fastening; using zinc-plated bolts, lock nuts, and nylon washers prevents the sign from rattling or tearing at the mounting points.
For these high-visibility applications, we recommend using UV-printed corosigns paired with premium steel or aluminum frames. The UV-cured ink resists fading from direct sunlight, while the rigid frame provides the structural support needed for a crisp, non-warped appearance. Adhering to FHWA sign installation guidelines ensures that even these more robust installations remain compliant with safety standards regarding height and crashworthiness, protecting both your brand and the public.
Real Estate and Colonial Frame Assembly
Assembling a “banjo” or colonial-style swing frame requires careful alignment of pre-drilled holes. When working with PVC and styrene signs, ensure the panel is centered within the metal frame before tightening any fasteners. If your campaign includes “riders”—smaller signs for agent names or specific property features—secure them to the top or bottom of the main frame using specialized rider clips. For heavy-duty angle iron posts, use a sledgehammer or post driver to sink the frame at least 12 to 18 inches into the soil. This “Hammer-In” technique provides the leverage needed to keep the sign stable in high-traffic areas where wind gusts from passing trucks are common.
Alternative Mounting: Fences and Structures
Sometimes the best placement isn’t in the dirt. When you install yard signs on chain-link fences, use heavy-duty, UV-rated zip ties through reinforced metal grommets. Don’t simply poke holes through the plastic; this creates a failure point that will rip during the first storm. If you’re mounting to wooden posts or walls, select stainless steel or galvanized screws to prevent rust bleeding, which can stain your graphics over time. Proper tension is key. The sign should be snug against the surface but not so tight that the panel bows, which can distort your message and reduce visibility for oncoming traffic.
Strategic Visibility: The ‘2-Second Test’ and Sightline Engineering
Placement dictates profit. Even the most visually stunning graphic fails if it sits in a driver’s blind spot. When you plan to install yard signs, you aren’t just choosing a spot in the grass; you’re engineering a visual encounter. The International Sign Association reports that well-placed signage can increase sales by 15% or more, but achieving this requires an understanding of the “Angle of Incidence.” Positioning your sign parallel to the road is a common amateur mistake. Drivers don’t look 90 degrees to their side while moving. Instead, angle the sign face slightly toward oncoming traffic to increase the duration of the “read window.”
Elevation is your secondary defense against roadside clutter. If your sign sits too low, it disappears behind parked cars, tall weeds, or utility boxes. For a deeper dive into industry-specific tactics, consult our Ultimate Guide to Real Estate Yard Signs. Strategic height and thoughtful angling ensure your message cuts through the environmental noise and reaches the intended audience with professional clarity.
Executing the 2-Second Visibility Test
Readability is a function of vehicle speed. At 35 mph, a driver has roughly several seconds to process your message; at 55 mph, that window shrinks significantly. Perform a “2-Second Test” by driving the route yourself at the posted speed limit. If you can’t digest the primary call to action in two seconds, you need to move the sign or increase the font contrast. Check for “Contrast Blindness” where your sign colors bleed into the background. A green sign in front of a lush hedge is effectively invisible. Use high-contrast color pairings like black on yellow or white on navy to ensure the panel pops against the natural topography.
Weatherproofing and Long-Term Maintenance
A professional installation isn’t a “set and forget” task. High-wind areas require specific loading strategies to prevent the sign from acting like a sail and pulling the stakes out of the ground. For large-format displays, consider using mesh banners or adding wind slits to corrugated panels to allow air passage. Establish a 30-day maintenance cycle to straighten leaning stakes and wipe down the sign faces. Road grime and salt can dull your graphics, but a quick rinse with water and a soft cloth will preserve the vibrancy of your UV inks without degrading the material. If you’re ready to deploy a campaign that stands the test of time, browse our full range of durable outdoor signs today.
Scaling Your Campaign: Professional Production and Logistics
Managing a handful of signs is a simple task; deploying hundreds across a national territory is a complex logistical operation. When you prepare to install yard signs at scale, every minor error in production is magnified. A slight color shift or a low-resolution graphic becomes a glaring brand failure when repeated across 500 units. High-volume campaigns demand a partner who understands the technical nuances of large-format production. Using professional outdoor signs ensures that your first installation looks exactly like your last, maintaining the prestige of your brand across every zip code. This consistency builds the community trust necessary for high-stakes projects.
In dense metropolitan areas where soil is scarce, your strategy must pivot to maintain visibility. While you might install yard signs in suburban corridors, urban environments often require the stability of A-frame signs. These portable, heavy-duty solutions provide the same high-impact branding on concrete sidewalks where traditional stakes aren’t an option. By diversifying your hardware based on the specific terrain of each site, you ensure a long-lasting outdoor presence that isn’t limited by geography.
Design Optimization for High-Volume Printing
Roadside legibility starts with vector graphics. Unlike raster images that pixelate and blur when scaled to large formats, vector files ensure your text remains razor-sharp from 50 feet away. We employ rigorous color calibration to maintain brand integrity across every unit, regardless of the print run size. Automated die-cutting requires specific margin and bleed settings to prevent white edges or cut-off text. These technical specifications are the difference between a sign that looks premium and one that looks like a rush job. Our master craftsmen obsess over these details so your vision is realized with absolute precision.
Logistics and Multi-Site Distribution
Speed is the currency of modern marketing, and our “Order-to-Install” pipeline is designed for momentum. We streamline deployment through custom kitting, where signs and hardware are bundled together for immediate field distribution. This removes the friction of matching stakes to panels on-site, allowing your team to move quickly. For national campaigns, leveraging regional production hubs reduces transit times and shipping costs significantly. Our corporate portals allow decentralized teams to order pre-approved designs with ease. This ensures that every local representative has the high-quality materials they need to maintain a high-visibility presence while strictly adhering to corporate brand standards.
Command the Roadside with Professional Execution
Mastering the technical mechanics of outdoor signage transforms a simple plot of grass into a powerful marketing asset. By prioritizing meticulous site assessment and leveraging sightline engineering, you ensure that every message reaches its intended audience with clarity and impact. When you prepare to install yard signs, you’re not just placing a product; you’re deploying a precision-engineered solution designed to withstand the elements while maintaining a high-prestige appearance. Professionalism in installation is the final step in bringing your brand’s vision to life with quiet confidence.
Beyond the signs themselves, maintaining a professional image for your field team with custom screen printed t-shirts Lemoore CA ensures that every aspect of your roadside presence reflects the same high standards as your marketing materials.
Success in the field requires a partner who understands the demands of modern business. With over 20 years of large-format expertise, Image Square Printing provides the high-resolution, UV-resistant output your high-stakes projects deserve. Whether you’re managing a single local listing or a massive national rollout through our streamlined corporate portals, we offer the reliable logistics and nationwide shipping needed to keep your campaign on track. Order Your Professional Custom Yard Signs Today and take the first step toward a more visible, authoritative brand presence that truly commands attention.
Frequently Asked Questions
How do I install yard signs in very hard or frozen ground?
Soften the earth by pouring roughly half a gallon of water over the intended site and waiting ten minutes for it to soak in. If the ground is frozen solid, use a masonry drill bit to create pilot holes for the H-stake tines. This technical approach prevents the metal from bending and ensures your sign maintains a professional vertical alignment even in the most difficult winter terrain.
Can I use a hammer to drive H-stakes into the ground?
Avoid using a standard metal hammer because it can chip the protective coating or deform the top of the tines, making it difficult to mount the sign. Instead, use a heavy-duty rubber mallet or apply even foot pressure to the bottom crossbar of the stake. This protects the structural integrity of the hardware and ensures the sign panel slides onto the flutes smoothly without snagging or tearing.
What is the best height for a yard sign to be visible to drivers?
Aim for a height that places the center of the sign panel approximately 12 to 24 inches above the ground. This elevation is critical for overcoming roadside clutter like tall grass, parked vehicles, or utility boxes that can obstruct a driver’s view. Signs that sit too low often fail the 2-second visibility test because they vanish into the natural topography of the site.
Are there legal restrictions on where I can install yard signs?
Most municipalities enforce specific “setback” rules that require signs to be placed a certain distance from the curb, sidewalk, or property line. You must also verify local ordinances regarding the size, number, and duration of your display, especially for commercial or political campaigns. Always check for underground utility lines before you install yard signs to avoid damaging buried infrastructure or violating safety codes.
How do I prevent my yard signs from blowing away in high winds?
Use heavy-duty frames or double up on H-stakes for larger panels to increase their resistance to wind pressure. Adding small “wind slits” to corrugated plastic panels or opting for mesh materials allows air to pass through the sign rather than pushing against it like a sail. Securely anchoring your stakes at least 12 inches into the soil provides the necessary leverage to withstand sudden gusts from passing traffic.
Should I put the stake in the ground first or into the sign first?
Use the stakes-first approach for hard or unknown soil conditions to ensure the metal is securely anchored before you add the graphic panel. For high-volume campaigns in soft soil, pre-assembling the sign and stake in your vehicle allows for more rapid field deployment. Whichever method you choose, ensure the tines are perfectly centered within the internal flutes to prevent the metal from piercing the outer skin of the sign.
How long do custom yard signs typically last outdoors?
High-quality corrugated plastic signs generally last between 6 and 12 months outdoors depending on their exposure to direct sunlight and local weather. Signs produced with UV-resistant inks maintain their color vibrancy significantly longer by resisting the fading effects of solar radiation. For semi-permanent displays, transitioning to aluminum or PVC materials will provide superior durability and a more sophisticated brand image over several years.
How do I clean my yard signs without damaging the print?
Remove road grime, dust, and salt by rinsing the sign face with plain water and wiping it gently with a soft, non-abrasive cloth. Avoid using harsh chemicals, solvent-based cleaners, or scrub brushes, as these can degrade the UV inks and dull the finish of the panel. A quick cleaning every 30 days keeps your graphics looking sharp and preserves the professional prestige of your outdoor campaign.