What if the difference between a high-prestige storefront and a costly DIY disaster is just three degrees of misalignment and a single trapped air bubble? You’ve invested in premium custom-printed window decals to elevate your brand’s presence, and it’s natural to feel a sense of pressure about getting the application perfect. We understand the frustration of watching expensive materials fail due to edge peeling or poor technique. This Window Graphics Installation Guide provides the technical precision required to turn your creative vision into a flawless, high-impact reality.
With the global window film market projected to reach $18.81 billion in 2026, professional-grade visual branding has never been more critical for standing out in a competitive commercial environment. We’ll help you master the engineering behind bubble-free application, ensuring your space reflects the quiet confidence and reliability of your business. This guide covers everything from essential tool kits to the specific nuances of wet versus dry application methods. We also provide a clear roadmap for managing large-format vinyl and adhering to local municipal regulations, so your project moves from production to perfection without any friction.
Key Takeaways
- Align your installation with the psychological expectations of your audience to turn a simple storefront into a high-trust branding asset.
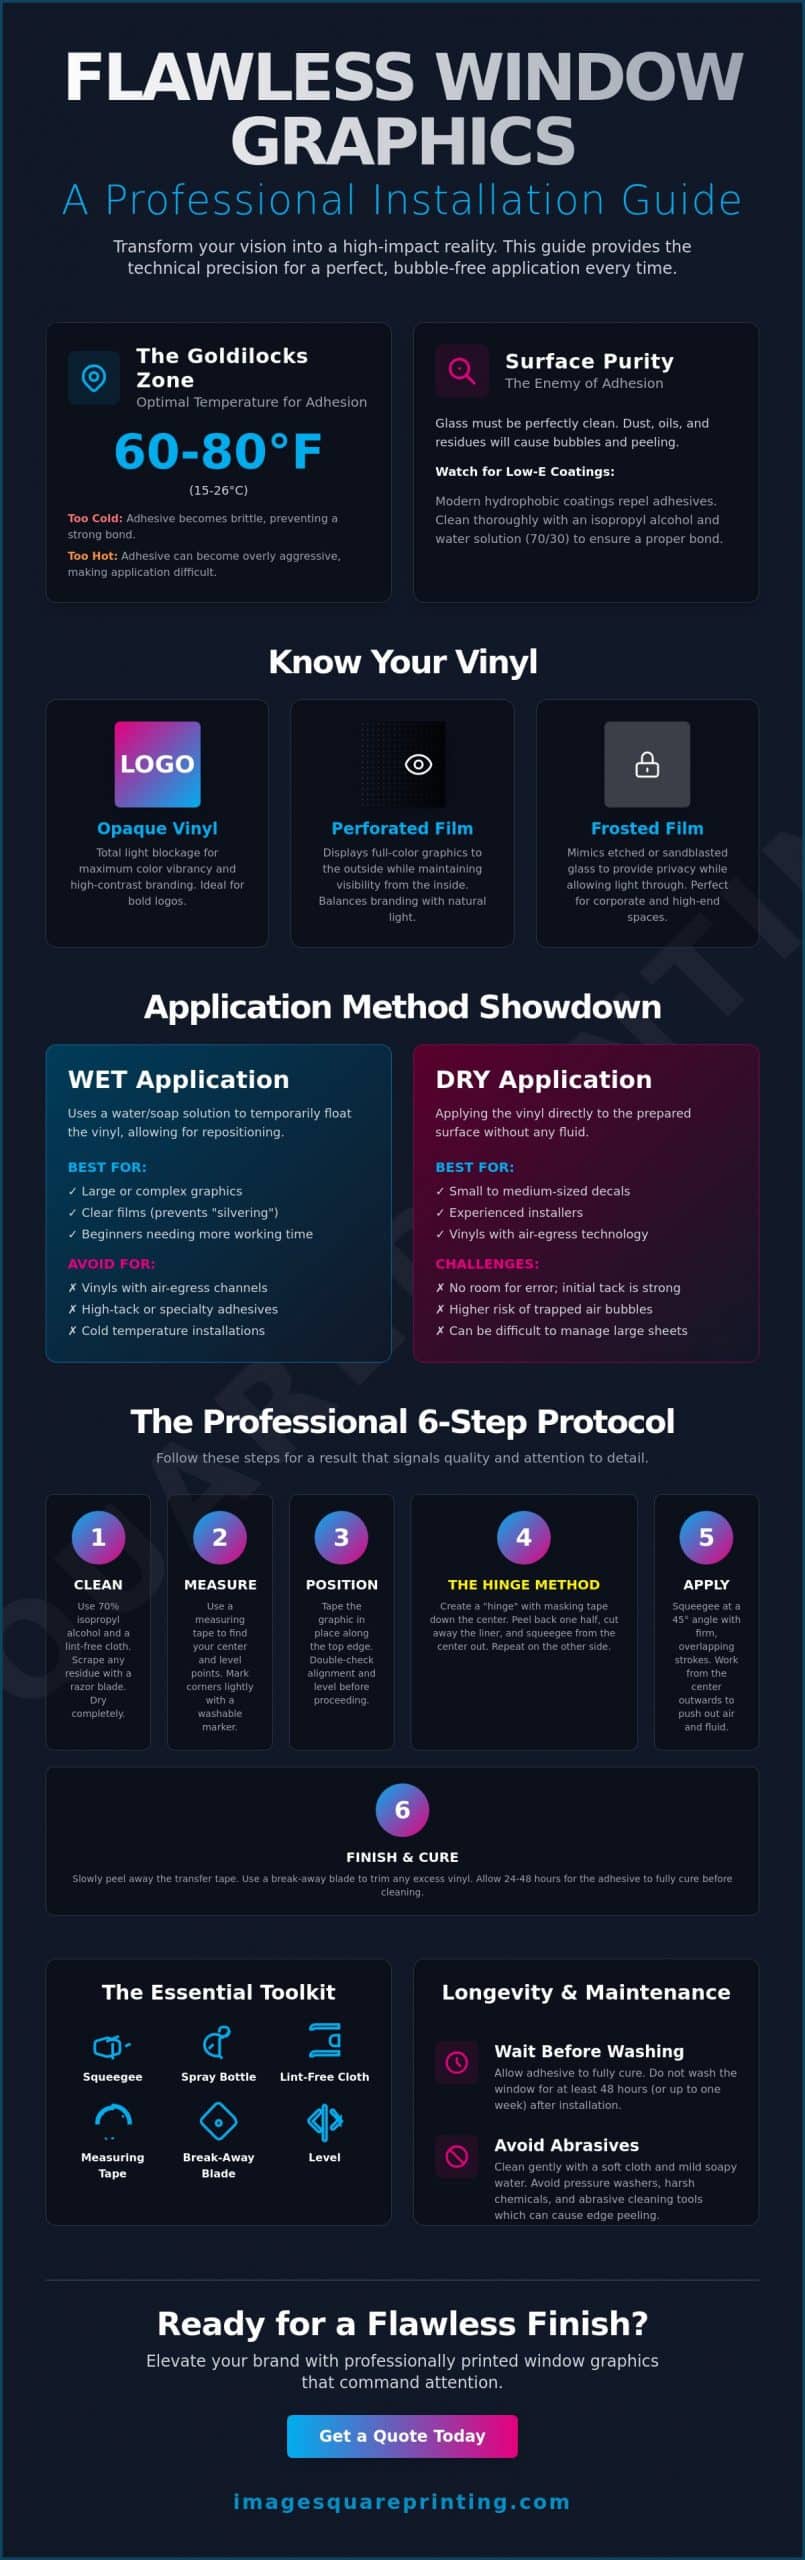
- Master the “Goldilocks Zone” of temperature and surface preparation within this Window Graphics Installation Guide to ensure permanent, bubble-free adhesion.
- Choose the optimal application technique between wet and dry methods to prevent silvering on clear films or misalignment on high-tack specialty vinyl.
- Utilize the professional “Hinge Method” and precision tools like break-away blades to achieve the level, centered results that define expert craftsmanship.
- Extend the lifecycle of your graphics by implementing a strict post-installation maintenance protocol that avoids abrasive chemicals and premature cleaning.
The Strategic Impact of High-Quality Window Graphics
Your storefront windows are more than just glass partitions. They function as the primary visual interface between your brand and your physical audience. In high-stakes commercial environments, these surfaces serve as high-impact canvases that dictate how potential clients perceive your professionalism. A flawless execution suggests a business obsessed with detail and quality. Conversely, a poor application can immediately erode consumer trust. This Window Graphics Installation Guide explores how to bridge the gap between creative design and technical excellence to ensure your brand prestige remains intact.
The psychological impact of a window display is immediate. When a customer approaches a professional space, they subconsciously evaluate the environment for reliability. Bubbles, wrinkles, or crooked edges don’t just look messy; they signal a lack of attention to detail that customers may assume extends to your core services. High-quality window decals act as a silent salesperson, communicating brand authority before a single word is exchanged. Because of this, the material you choose and the precision of the application are strategic business decisions, not just aesthetic ones.
Defining the Categories of Window Vinyl
Understanding the physical properties of your media is the first step in a successful Window Graphics Installation Guide. Different materials require distinct handling techniques to achieve a professional finish. Through modern decal production, businesses can choose from several specialized films:
- Opaque Vinyl: This is the gold standard for high-contrast branding. It provides total light blockage, making it ideal for bold logos and vibrant colors that need to pop against any background.
- Perforated (One-Way) Film: These films allow you to maintain visibility from the inside while displaying full-color graphics to the outside world. It’s a sophisticated solution for retail fronts that need branding without sacrificing natural light.
- Frosted and Etched Glass Films: Often used in corporate offices, these films elevate privacy while maintaining an airy, high-end feel. They mimic the look of expensive sandblasted glass at a fraction of the cost.
Why Installation Quality is a Branding Decision
Visual impact is only half the battle. The longevity of your graphics depends entirely on the caliber of the install. While a DIY attempt might look acceptable from a distance for a few days, it often leads to edge peeling and silvering within weeks. Professional installation ensures the adhesive bonds correctly to the glass, protecting your investment for the long term. If you’re looking to extend this high-impact visual strategy beyond your windows, consider our professional wall murals guide for a cohesive interior branding experience. By treating your windows as a technical engineering project rather than a simple sticker application, you secure a visual presence that commands respect and drives foot traffic.
Environmental Variables and Adhesion Science
Successful application depends on more than just steady hands; it requires an understanding of adhesion science. The “Goldilocks Zone” for most pressure-sensitive adhesives falls between 60°F and 80°F. Within this range, the adhesive maintains the perfect viscosity to flow into the microscopic valleys of the glass surface. If you operate outside these parameters, you risk immediate or latent failure. This Window Graphics Installation Guide prioritizes these environmental factors to ensure your branding remains permanent and professional.
Surface energy is another critical variable. Modern commercial glass often features hydrophobic or low-E coatings designed to repel water and dirt. Unfortunately, these same properties can repel vinyl adhesives. A surface with low energy causes the adhesive to bead up rather than “wet out,” which is the process of the adhesive spreading evenly to create a bond. Proper lighting is your best defense during this stage. Use a high-lumen inspection light to identify micro-dust, debris, or moisture trapped behind the film before the bond becomes permanent. Trapped moisture or “outgassing” from certain substrates creates unsightly bubbles that often appear hours after you’ve finished the job.
Temperature and Humidity Control
Extreme cold makes adhesive brittle. It prevents the film from conforming to the glass and leads to immediate adhesion failure. On the other hand, extreme heat causes vinyl to over-stretch. This leads to distorted graphics and edge curl once the material cools and attempts to return to its original shape. For outdoor projects, schedule your work for early morning or use a heat gun to stabilize the temperature of the glass surface. Managing these variables is a hallmark of a sophisticated installer who understands that the environment is just as important as the tool kit.
Chemical Preparation and Surface Decontamination
Many installers reach for standard glass cleaners, but ammonia-based products are a disaster for vinyl. Ammonia leaves a chemical film that prevents a secure bond and can cause the adhesive to break down over time. The industry standard is the 70% Isopropyl Alcohol rule. After a deep clean, perform a final wipe with IPA to ensure a completely sterile surface. This process is essential when removing residue or “ghosting” from previous decals. For more technical details on substrate readiness, refer to 3M’s professional dry application procedures. If you’re unsure about your surface’s compatibility, checking our selection of floor and wall decals can help you identify the right high-tack solutions for difficult surfaces.
Wet vs. Dry Application: Choosing Your Technique
Deciding on an application technique is a critical fork in the road for any Window Graphics Installation Guide. The choice between wet and dry methods depends on the scale of the project, the type of vinyl substrate, and the specific environmental conditions. While dry application offers immediate adhesion and speed, the wet method provides a safety net for large-format graphics that require surgical precision in alignment. Each approach has its own set of technical requirements that dictate the final quality of the bond and the professional appearance of the finished project.
For the wet method, the slip solution is your most important tool. Don’t use tap water; the minerals can leave deposits that cause “silvering” or cloudiness on clear films. Use distilled water mixed with a few drops of pH-neutral soap. This mixture breaks the surface tension, allowing the graphic to float on the glass until you’ve achieved perfect positioning. This method is particularly effective for clear films where any trapped air or dust would be immediately visible. It provides the installer with the control needed to manage high-stakes branding projects without the fear of immediate, permanent mistakes.
When to Use the Dry Method
The dry method is the industry standard for smaller window decals and specialty “Air Release” films. These materials feature microscopic channels in the adhesive that allow air to escape during the squeegeeing process, making them highly efficient for quick installs. It’s also mandatory for perforated window film. Never use a wet application for perforated materials. Water trapped in the perforations can lead to visual distortion, mold growth, or premature adhesive failure. To manage static electricity during dry installs, keep a grounded anti-static string or specialized wipes on hand to prevent the vinyl from jumping toward the glass before you’re ready to commit the adhesive.
Mastering the Wet Method for Large Panes
When you’re dealing with massive panes of glass, the wet method is essential. It allows you to reposition the entire graphic without stretching the vinyl, which is a common risk when handling large sheets. Once aligned, your squeegee technique must be aggressive and methodical. Start from the center and work outward in overlapping strokes to evacuate 100% of the fluid. Any remaining moisture will prevent the adhesive from bonding and may create permanent bubbles later. Drying times vary based on humidity, but you should typically wait at least 60 minutes before attempting to peel the transfer tape. If the graphic lifts with the tape, it’s still too wet. Wait longer to ensure a high-impact finish that reflects the prestige of your brand.
The Professional Installation Protocol: Step-by-Step
Precision is the hallmark of professional execution. To achieve results that command respect, you must approach the glass with a specific toolkit and a disciplined methodology. A master craftsman relies on felt-edged squeegees to prevent scratching, break-away blades to ensure a surgically sharp point for every cut, and industrial heat guns to set the vinyl’s memory. This Window Graphics Installation Guide outlines the exact protocol used by industry veterans to transform raw vinyl into high-impact branding assets.
The “Hinge Method” stands as the industry standard for maintaining perfect alignment. Rather than peeling the entire backing at once, which invites dust and misalignment, you create a stable anchor point. This technique allows you to manage large-format sheets with total control, ensuring the graphic doesn’t drift during the application process. Once the anchor is set, the “Center-Out” squeegee pattern becomes your primary movement to evacuate air and prevent the bubbles that plague amateur attempts.
Phase 1: Positioning and the Top Hinge
Start by securing the graphic in its final position using low-tack painter’s tape. Take double measurements from the window frame to the graphic edge to guarantee it’s perfectly level. Create a horizontal hinge across the top of the decal with a strip of tape. Flip the graphic up, peel back a few inches of the liner, and cut it away. As you drop the graphic back down, use overlapping squeegee strokes from the center toward the edges. This initial bond creates a permanent anchor, allowing you to remove the tape and work down the rest of the pane with confidence.
Phase 2: Trimming and Finishing
The secret to longevity lies in the edges. Never run your vinyl directly to the edge of the window frame or onto the rubber gasket. Instead, trim the vinyl approximately 1/16th of an inch back from the gasket. This small gap prevents the vinyl from lifting as the glass expands and contracts with temperature changes. Use “Relief Cuts” at corners and around hardware to prevent tension from pulling the material away from the surface. Finally, use a heat gun to “post-heat” the edges. This process resets the vinyl’s plastic memory to its new flat shape, ensuring it won’t curl over time.
Phase 3: Multi-Panel Alignment
Managing large-scale graphics across multiple window panes, or mullions, requires advanced planning. You must decide between a “butt-seam,” where edges meet perfectly, or a slight overlap. For most commercial projects, we recommend a 0.5-inch bleed to ensure pattern continuity across window dividers. This prevents the visual “break” that occurs when an image doesn’t align across the gaps. For projects requiring this level of technical complexity, our large format printing services provide the high-precision output necessary for seamless multi-panel displays. If you’re ready to elevate your commercial space with expert-grade visuals, order your high-precision window graphics today and ensure your brand makes a flawless first impression.
Maintenance, Longevity, and Removal
The final squeegee stroke marks the beginning of the graphic’s lifecycle, not the end. To ensure your investment delivers maximum impact, you must respect the curing process. The first 48 hours are non-negotiable. During this window, the adhesive is still wetting out and establishing its permanent bond with the glass. Avoid all cleaning and excessive touching during this period. This Window Graphics Installation Guide emphasizes that patience at this stage prevents edge curling and the latent failure often seen in rushed projects.
Longevity is often determined before the install begins through the use of protective laminates. High-quality lamination acts as a sacrificial layer against UV radiation, which can otherwise fade vibrant inks within a single season. Professionally laminated window decals maintain their color integrity for several years, even in high-exposure storefronts. When the time eventually comes for a brand refresh, removal should be just as precise as the installation. Use a heat gun to soften the vinyl and a specialized adhesive remover to ensure the glass remains pristine. This protective approach preserves the value of your physical assets while preparing the surface for your next high-impact visual.
Cleaning Protocols for Window Vinyl
Maintenance requires a gentle touch to preserve the finish of the vinyl. Always rinse the surface with clean water first to remove grit that could scratch the print during wiping. Use a soft microfiber cloth and a mild, pH-neutral detergent. Avoid abrasive pads, squeegees with metal edges, or harsh solvents like acetone. These same principles apply to floor and wall decals that may be part of your broader environmental branding strategy. Keeping all surfaces free of debris ensures your visual narrative remains crisp and professional throughout its lifespan.
When to Call a Professional Installer
While small decals are manageable for many business owners, large-scale projects require the steady hand of a master craftsman. We recommend the “18×24 Rule”: any graphic exceeding 18 by 24 inches usually benefits from professional handling to avoid material waste. Complex architectural glass or high-elevation storefronts introduce risks that go beyond standard DIY capabilities. Windows higher than 14 feet often require specialized equipment and carry additional labor considerations due to the increased difficulty. A professional site survey can identify surface energy issues or local regulatory hurdles before you commit to a print run. This proactive approach removes friction and guarantees a result that matches the high-stakes standards of modern commercial spaces.
Master the Art of High-Impact Visual Branding
Transforming a commercial window into a high-prestige branding asset requires a blend of technical mastery and environmental awareness. This Window Graphics Installation Guide has detailed the critical importance of the “Goldilocks Zone” for adhesion and the precision of the hinge method for flawless alignment. By prioritizing surface decontamination and post-heating protocols, you ensure your graphics withstand the elements and maintain their professional edge for years. Success lies in treating every pane of glass as an engineering challenge that rewards patience and attention to detail.
When your project demands the highest standards of durability and visual impact, partner with a team that understands the nuances of large-scale production. We provide professional site surveys to assess surface compatibility and utilize high-resolution UV-stable inks to ensure your branding remains vibrant in any environment. Whether you need local expertise or support for national accounts, we are ready to bring your vision to life with expert installation. Order your custom window graphics from Image Square Printing today and secure a storefront that commands attention. Your space is your most valuable visual interface; let’s make it unforgettable.
Frequently Asked Questions
Can I install window graphics on tinted glass?
Installation on tinted glass is possible, but success depends on which side of the pane the tint is applied. Most commercial tint is an interior film. If you’re applying graphics to the exterior, there’s no risk to the tint. However, applying adhesive vinyl directly over interior tint can cause the tint to delaminate or tear during the eventual removal process.
How do I get rid of small air bubbles after the installation is finished?
Small air bubbles can be eliminated using a fine needle or a professional air-release tool. Prick the bubble at its edge rather than the center, then use your thumb to gently push the air toward the hole. Avoid using a blade to cut the vinyl; this creates a visible slit that can collect dirt and lead to premature peeling.
How long do professional window graphics typically last outdoors?
Professional window graphics typically last between 3 and 7 years in outdoor environments. The exact lifespan depends on the vinyl quality and whether a UV-protective laminate was applied during production. Graphics on south-facing windows receive the highest sun exposure and may show wear faster than those in shaded or north-facing locations.
What is the best way to clean windows with perforated vinyl?
The best method for cleaning perforated vinyl is a gentle rinse with low-pressure water and a mild, pH-neutral soap. Avoid high-pressure washers, as they can force water into the perforations and lift the material from the glass. Use a soft microfiber cloth to pat the surface dry instead of rubbing, which can snag the edges of the small holes.
Will the adhesive damage my storefront glass or leave a permanent residue?
High-quality adhesives won’t damage storefront glass because glass is a non-porous surface. While some residue might remain after removal, it’s easily cleared with a citrus-based adhesive remover and a specialized glass scraper. This Window Graphics Installation Guide recommends using professional-grade vinyl to ensure the removal process is as clean and efficient as the initial application.
Can I reuse a window decal after it has been removed?
Standard adhesive window decals can’t be reused once they’ve been removed from the glass. The removal process naturally stretches the vinyl and compromises the chemical bond of the adhesive, making a second application impossible. If your project requires frequent changes or seasonal updates, consider using static clings or specialized repositionable films instead of permanent adhesive vinyl.
What is the difference between a window decal and a window cling?
The primary difference lies in the attachment method; decals use a pressure-sensitive adhesive, while clings rely on static electricity. Decals provide a semi-permanent, high-durability bond suitable for long-term branding and outdoor exposure. Clings are designed for temporary, interior promotions and can be removed and repositioned multiple times without any chemical residue.
Do I need a heat gun for every window graphic installation?
A heat gun isn’t strictly required for small decals, but it’s essential for large-scale projects and professional edge sealing. Heat allows the vinyl to conform to the surface and sets the “plastic memory,” which prevents the edges from curling or lifting over time. Following a professional Window Graphics Installation Guide protocol often requires heat to ensure the graphic stays secure during temperature fluctuations.