
A decal’s hold depends on the wall beneath it. Effective surface preparation for wall decal application means removing dust, grease, and residue, then letting the surface dry completely; a cleaner containing at least 70% isopropyl alcohol is recommended for suitable finishes, but avoid alcohol on matte paint. Keep the decal flat before you start, and use a squeegee or soft cloth to smooth it into place.
It’s easy to focus on a decal’s design and rush through preparation, but a clean, dry wall and careful positioning help create a neater application. The right approach also depends on the wall’s finish, so one cleaning method won’t suit every surface.
Gather the right tools, clean and dry the wall, then align, smooth, and apply the decal. These steps also cover textured walls and newly painted surfaces, helping you prepare carefully before the decal touches the wall.
Key Takeaways
- Gather the right cleaning and smoothing tools before you begin, and choose a cleaner that won’t leave a film behind.
- Remove dust, grease, and old adhesive residue, then let the wall dry completely before applying the decal.
- Plan the decal’s position first so you can align it carefully and apply steady pressure as you work across the graphic.
- Check the room and wall conditions before installation; temperature and surface texture can affect how well a decal adheres.
- Small preparation choices can help you avoid trapped air, lifted edges, and a crooked finish.
What Tools Do I Need to Install Wall Decals?
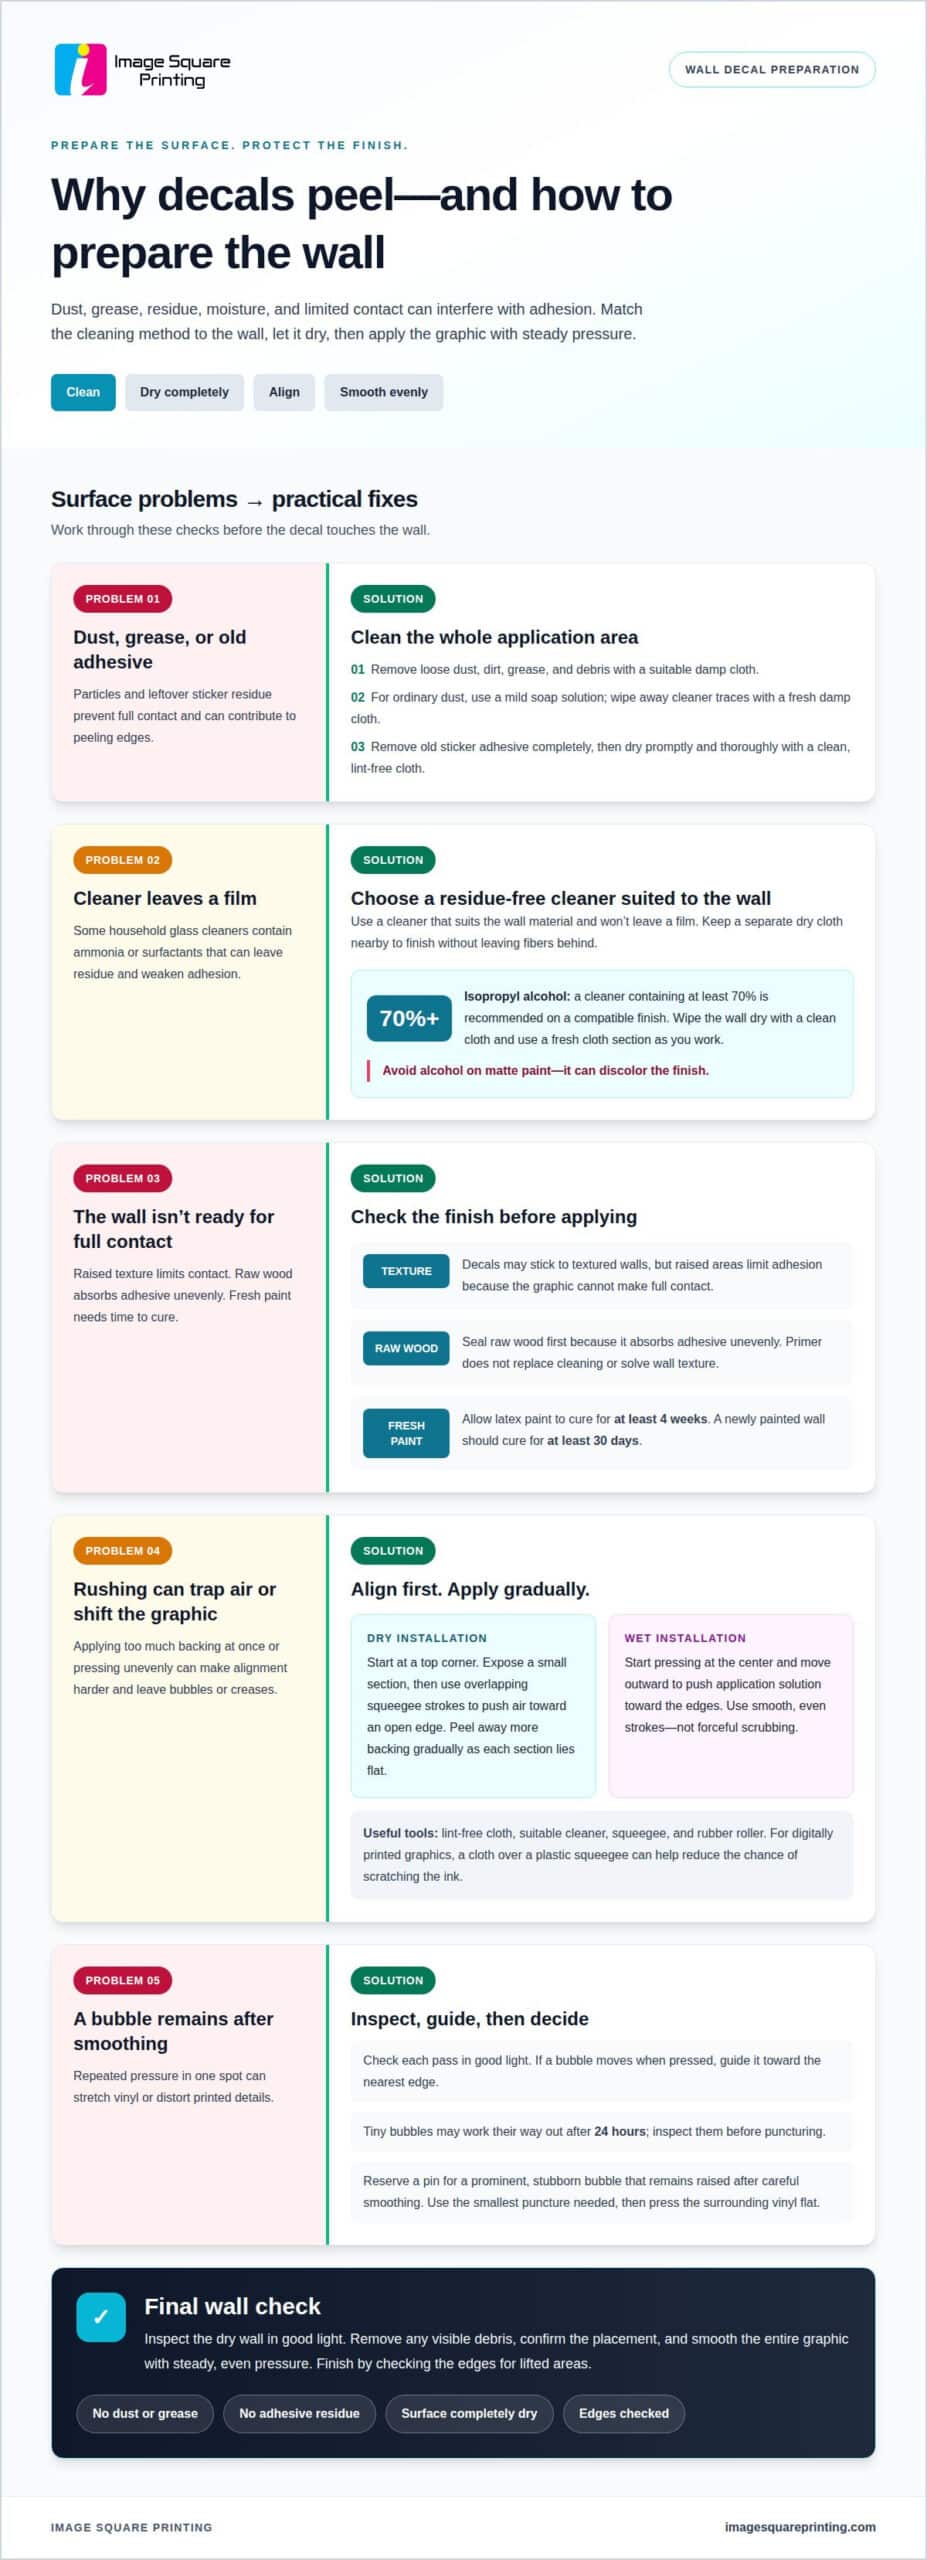
Gather a lint-free cloth, a suitable cleaner, and a squeegee before you start. Effective surface preparation for wall decal application depends on the wall finish and the residue you need to remove.
Choose a Residue-Free Cleaner
Choose a cleaner that suits the wall material and won’t leave a film. Household glass cleaners can contain ammonia or surfactants that leave residue and weaken decal adhesion. The Centers for Disease Control and Prevention recommends cleaning environmental surfaces with soap and water, or with a detergent or disinfectant, depending on the surface and contamination.
For ordinary dust, wipe with a mild soap solution, then remove cleaner traces with a fresh damp cloth. Remove old sticker adhesive completely before applying a new decal; leftover residue prevents full contact and can contribute to peeling edges. Keep a separate dry cloth nearby to finish without leaving fibers on the wall.
Clean and Prepare the Wall
Remove loose dust, dirt, grease, and debris from the entire application area. Even a wall that looks clean can hold particles that interfere with the adhesive. Wipe gently with a suitable damp cloth, then dry the surface promptly and thoroughly. The U.S. Environmental Protection Agency advises drying surfaces cleaned by damp wiping quickly and completely.
Can wall decals stick to textured walls? They may, but adhesion is limited because raised texture prevents full contact. Should you use primer or sealant before applying wall decals? Seal raw wood first because it absorbs adhesive unevenly; primer doesn’t replace cleaning or address texture. Latex paint should cure for at least 4 weeks, while a newly painted wall should cure for at least 30 days.
For projects involving freestanding graphics, placement also matters. A custom life-size cutout stand doesn’t rely on wall adhesion, unlike a decal applied directly to a surface.
Clean with Isopropyl Alcohol
Use a cleaner containing at least 70% isopropyl alcohol on a compatible finish. Spray the wall and wipe it dry with a clean cloth, even if the area appears spotless. This pass helps lift fine residue that can interfere with the adhesive. Use a fresh cloth section as you work, so you don’t spread dust or grease back over the surface.
Avoid alcohol on matte paint because it can discolor the finish. Why do wall decals peel after application? Dust, grease, old adhesive, moisture, or limited contact on textured walls can contribute. A film from ammonia-containing glass cleaner can also weaken adhesion. For reliable surface preparation for wall decal application, inspect the dry wall in good light and remove any remaining visible debris before positioning the graphic.
Smoothing the decal and removing air bubbles
Work from one edge toward the other, applying steady pressure to bond the graphic evenly. A squeegee, rubber roller, and careful inspection help you spot and address air bubbles as you work.
- Position the decal, then expose only a small section of its adhesive at first. For a dry installation, press from a top corner and work across the exposed area. Use overlapping squeegee strokes to push air toward an open edge instead of trapping it beneath the vinyl. Continue gradually, peeling away more backing as each section lies flat. This controlled pace helps maintain alignment on a large graphic.
For a wet installation, start pressing at the center and move outward. This pushes application solution toward the edges. Use smooth, even strokes rather than forceful scrubbing, which can shift the decal or crease the material.
- Use a rubber roller or squeegee to press the graphic firmly against the surface. After removing transfer tape, smooth the decal with a felt-wrapped squeegee to help clear air pockets, creases, and bubbles. For a digitally printed wall graphic, place a cloth over a plastic squeegee to reduce the chance of scratching the ink. Keep the tool flat and move across the graphic in deliberate passes.
Check each pass in good light. If a bubble moves when pressed, guide it toward the nearest edge with the squeegee. Avoid pressing repeatedly in the same spot, which can stretch the vinyl or distort printed details.
- Release a prominent, stubborn bubble with a pin, then press the surrounding vinyl flat. Use the smallest puncture needed to let trapped air escape, and smooth the area with a squeegee. Tiny bubbles may work their way out after 24 hours, so inspect them before trying to puncture them. A pin is best reserved for a visible bubble that remains raised after careful smoothing.
Remove any residue left after application with a method compatible with the decal and underlying surface. Apply a small amount of suitable cleaner to a cloth, not directly to the graphic, and wipe gently. Stop if the ink or surface begins to change. Remove old sticker residue completely before applying a new decal; leftover adhesive can prevent full contact and contribute to peeling edges.
- Prepare vehicle paint and bumpers with care before applying a decal. Wax and vehicle-detailing products can leave hydrophobic coatings that interfere with adhesion. Clean the area, make two isopropyl alcohol passes, and allow 10-15 minutes for it to air out before applying. Avoid rubbing dust back onto the cleaned panel. These vehicle steps differ from wall application, so use them only for compatible automotive surfaces.
Finish by checking the edges and the entire graphic for lifted areas. Slow, even pressure helps the adhesive make consistent contact and lets you correct bubbles before completing the application.
Recommended installation temperature
Check the wall and surrounding air before applying graphics. Temperature affects how well decal adhesive makes contact, so choose a stable time to install.
Check Temperature Conditions
Measure the wall and room conditions before you position the decal. For most decals, the surface and surrounding air should be between 50°F and 85°F for best adhesion. Installation is also recommended above 50°F and below 90°F. Use 50°F to 85°F as the practical target range, rather than aiming near either broader limit.
Keep the surface at a stable temperature for at least an hour before application. A wall that has just warmed in direct sunlight or cooled near an open door may change during installation. Let conditions settle, then check the wall again. This gives the adhesive a steadier surface while you align and smooth the graphic.
Consider Temperature and Humidity
Assess the room and wall together, including whether the surface feels damp or shows condensation. You don’t need a humidity percentage for this practical check: a damp surface isn’t ready for a decal. Wait until the moisture has cleared and the wall feels dry, then confirm that the air and surface temperature remain within the recommended range.
What temperature and humidity are best for wall decal application? Aim for 50°F to 85°F at the wall and in the surrounding air, with the surface stable for at least an hour. Keep the wall dry and free of condensation; the provided installation guidance gives temperature ranges but no humidity target.
Room conditions can shift while you work. For example, an open exterior door can bring cooler air across part of the wall. Wait until the area is stable before starting, especially when a graphic spans a large surface. This helps prevent different sections of the decal from meeting different conditions.
- Plan the application for a period when the room can stay within range. Don’t rely only on a thermostat reading across the room; the wall itself may be warmer or cooler. Check the application area, particularly near windows, exterior walls, heating vents, or air-conditioning outlets. Conditions in these spots can differ from those in the center of the room.
If the wall or air falls below 50°F, wait before applying. If conditions rise above 85°F, consider postponing until they settle into the preferred range. The broader recommendation remains above 50°F and below 90°F, but the 50°F to 85°F range is the more suitable target for most decals.
- Recheck the wall immediately before application, after positioning your tools and the decal. Confirm that the surface temperature has remained stable for at least an hour and that no condensation has formed. If the air or wall conditions have changed, pause and let them settle before exposing the adhesive. This final check helps prevent temperature from becoming a late-stage variable.
For large graphics, work in a room where doors and vents won’t cause sudden changes during placement. A consistent environment helps each section meet similar conditions as you smooth it into place. Follow the decal’s product-specific installation instructions too, since general guidance may not suit every product.
Drying surfaces before applying decals
Let cleaning moisture evaporate before placing the decal. For surface preparation for wall decal application, the surface must be completely dry before a dry installation begins.
- Blot visible moisture with a clean, lint-free cloth, then let the wall air-dry. Don’t apply a decal while the surface feels damp or shows streaks. Moisture can interrupt adhesive contact, particularly near an edge or corner. Inspect the entire application area, including trim and textured patches, because a cloth may miss moisture in recessed spots.
After cleaning, a surface commonly needs 2 to 5 minutes to air-dry, depending on temperature and humidity. Use that range as a guide, then check the actual wall. Cool air or high humidity can slow evaporation, so wait longer if any dampness remains.
- Allow 5-15 minutes between cleaning and application, depending on the cleaner and surface type. Check the area under good light for damp-looking patches or cleaner streaks. If either remains, give the wall additional drying time. Don’t rely on the center alone; inspect edges and corners where moisture can linger after wiping.
After cleaning glass with alcohol, wait at least 5 minutes before applying a decal. The delay lets the cleaner evaporate across the whole area. Keep hands away from the glass during this period, since fingerprints can leave oils that interfere with contact. This timing is specific to alcohol-cleaned glass, not every wall material.
- Adjust the waiting period to the material instead of using one timer for every surface. Surface-preparation comparisons suggest 1-2 minutes for glass and windows, 2-4 minutes for metal equipment, and 3-5 minutes for sealed wood or painted signage. Temperature and humidity affect evaporation, so apply only when the surface is completely dry.
For a wall, check the entire decal footprint, not just one test spot. Look around trim, seams, and textured areas, where dampness may be less obvious. A dry center doesn’t mean the perimeter is ready for adhesive.
- Make a final inspection immediately before positioning the graphic. Confirm there are no damp marks, cleaner streaks, or visible residue. If you find any, wait and inspect again before applying. This final check is a practical part of surface preparation for wall decal application because moisture beneath vinyl can disrupt consistent contact.
Keep the decal’s backing in place while the wall dries. Once the area is dry, position the graphic and follow its product-specific installation instructions. This protects the adhesive while you wait and helps you start without transferring moisture from the backing or your hands.
What wall surfaces work best for wall decals
Choose a wall with a clean, smooth finish and stable paint. Surface texture, wood porosity, and paint additives can all affect decal adhesion.
- Inspect the wall visually and by touch before preparing it. A smooth, even finish gives the adhesive more consistent contact than a wall with pronounced ridges or deep texture. Run your hand over the intended area and note raised patterns, rough patches, peeling paint, or uneven repairs. These areas can leave gaps beneath the decal, even after cleaning.
Decals can be applied to textured walls, but adhesion may be limited even with careful preparation. Raised texture makes it harder for the adhesive to contact the wall across the entire graphic. For example, a shallow pattern may allow more contact than deep grooves, but neither is as consistent as a flat finish. Consider another location if the texture is pronounced.
- Check the paint finish and condition before choosing a decal location. Some paints contain dirt-repellent additives that may affect the adhesive bond. A wall can look freshly cleaned yet still resist adhesion because of its coating. Look and feel for flaking, chalky residue, or a slick finish, and avoid applying over loose paint.
Paint type matters as much as appearance. Matte paint can discolor if cleaned with alcohol, so use a compatible cleaning method instead. A stable, smooth painted surface is generally a better starting point than a heavily textured or damaged section. Keep the intended area consistent rather than spanning sharply different finishes with one decal.
- Seal raw wood before applying a decal. Unsealed wood absorbs adhesive unevenly, which can shorten the graphic’s life. Its porous grain may also create an inconsistent surface across the design. Apply a suitable sealant, let it dry fully, then check for rough grain or raised fibers before positioning the decal.
Check the sealed wood across the decal’s full footprint, not just at one corner. If the surface still feels rough or absorbs cleaning unevenly, the adhesive may not contact every area equally. A smooth, sealed finish provides a more uniform base than untreated wood.
- Choose the flattest, soundest area available, then prepare that exact footprint. Check that the paint is secure and the finish has no visible dirt, dust, grease, or old adhesive. Avoid placing a graphic across a corner, deep seam, or boundary between different wall materials. These transitions can interrupt contact and make edges harder to smooth down.
Match the decal to the wall rather than relying on cleaning alone to solve surface problems. A clean but deeply textured wall still limits adhesion, while raw wood still needs sealing. If the wall has mixed finishes, place the graphic entirely within the smoothest, most consistent section for better adhesive contact.
Image Square Printing: Custom wallpaper printing
Image Square Printing offers custom wallpaper printing and custom wall covering for projects that call for a coordinated, continuous visual across a wall. These options suit spaces where a small decal may not provide the scale or coverage the design needs. For a removable graphic in a more focused area, window decals may be a better fit.
Choose the format based on the wall, the intended visual impact, and how much of the surface you want to cover. A clean, suitable surface remains important for decal application; printed wall covering offers another route when the goal is a broader wall treatment. Explore custom wall covering options for projects that need a larger-scale finish.
Contact Image Square Printing to discuss the right visual format for your space.
Plan Your Next Wall Graphic
Make the wall part of a larger visual plan. Before settling on a design, decide whether the project calls for a focused decal, a full wall treatment, or coordinated graphics across several display surfaces. This helps you plan the scale and placement for the space, rather than treating the wall as an isolated detail.
Image Square Printing offers custom wallpaper printing and custom wall covering for broader wall treatments, along with Retractable Banner Stands to extend a visual identity to event displays. The right format depends on the surface and the impression you want to create. If you’re moving from a small graphic to a larger branded environment, thoughtful surface preparation for wall decal application remains useful during planning, even as the format changes.
Bring your project goals and the intended display area into the conversation. Contact Image Square Printing to discuss a visual solution that fits your space and creative direction. A well-planned graphic can help make the finished environment feel cohesive and intentional.
Frequently Asked Questions
How do you clean a wall before applying a wall decal?
Use a cleaning method suited to the wall’s finish, then remove any cleaner traces with a fresh cloth. For a final pass on compatible finishes, use a cleaner containing at least 70% isopropyl alcohol; avoid alcohol on matte paint, which can discolor. Let the wall dry fully, including around trim and corners. Before positioning the decal, inspect the area under good light for streaks, lint, or missed spots.
How long should paint cure before applying wall decals?
Allow latex paint to cure for at least 4 weeks before applying a wall decal; guidance for a newly painted wall recommends at least 30 days. A wall that still feels tacky or shows uneven sheen needs more time. Follow the paint’s care instructions and avoid pressing a decal onto a finish that may still be curing, since the adhesive can bond to unstable paint rather than a settled surface.
How do you test wall paint for decal adhesion?
Test an inconspicuous area with a small piece of the same decal material, using the intended application method. Press it down, then remove it carefully and inspect both the wall and the sample. Look for paint transfer, lifting, or a weak bond. A spot test can reveal a problem finish before you cover a prominent area, but it doesn’t replace checking for flaking or uncured paint.
How do you remove dust, grease, and residue from walls before decals?
First lift loose dust with a clean, dry cloth, then clean greasy marks with a surface-compatible method. Remove old sticker adhesive completely so it won’t interrupt contact beneath the new decal. Avoid ammonia-containing glass cleaners, which can leave a film. Use a fresh cloth for the final wipe, since a used one may spread grease or residue back over the prepared area.
How do you apply a wall decal without bubbles or wrinkles?
Position the decal before exposing all its adhesive, then apply it gradually from a top corner or edge. Use overlapping squeegee strokes to guide trapped air toward an open edge. Keep the material taut without stretching it, and pause if a crease forms so you can carefully lift and reposition that section. For a wet installation, work outward from the center to push application solution toward the edges.
Can wall decals be applied over wallpaper or fresh paint?
Fresh paint needs time to cure before a decal is applied. Allow latex paint at least 4 weeks; newly painted walls should cure for at least 30 days. Wallpaper varies in texture and condition, so inspect it closely. Loose seams, peeling areas, or pronounced texture can limit contact and adhesion. A sound, smooth section is a better candidate than damaged wallpaper, but test an inconspicuous spot first.
What tools are needed to prepare a wall for a decal?
Set out a lint-free cloth, a surface-compatible cleaner, and a squeegee before starting. A cleaner containing at least 70% isopropyl alcohol can be used on compatible finishes, but not matte paint. A rubber roller can help press the graphic flat; reserve a pin for a prominent bubble that remains after smoothing. Keep a separate clean cloth nearby to avoid transferring dirt during the final wipe.